
As you probably already know, Angular already exists on many platforms:
- Ionic ( https://ionicframework.com/ )
- NativeScript ( https://www.nativescript.org/ )
- NestJs ( https://nestjs.com/ )
- Universal ( https://github.com/angular/universal )
- Platform-terminal, console application ( https://github.com/Tibing/platform-terminal )
Well, of course, there was not enough desktop here (let’s not talk about Electron yet).
For creating desktop applications, there are many solutions using templates, for example, such solutions as JavaFx, Qt, WPF. All of them, except the last, are cross-platform.
But what if we wanted to use the familiar framework and make a native application on it? Actually, that’s what we did.
To begin with, we looked at what is currently available, and what may have already been done under Angular.
Search
libui-node
It is a lightweight, portable GUI library that leverages the native features of the GUI for each platform it supports. It comes as an alternative to Electron.
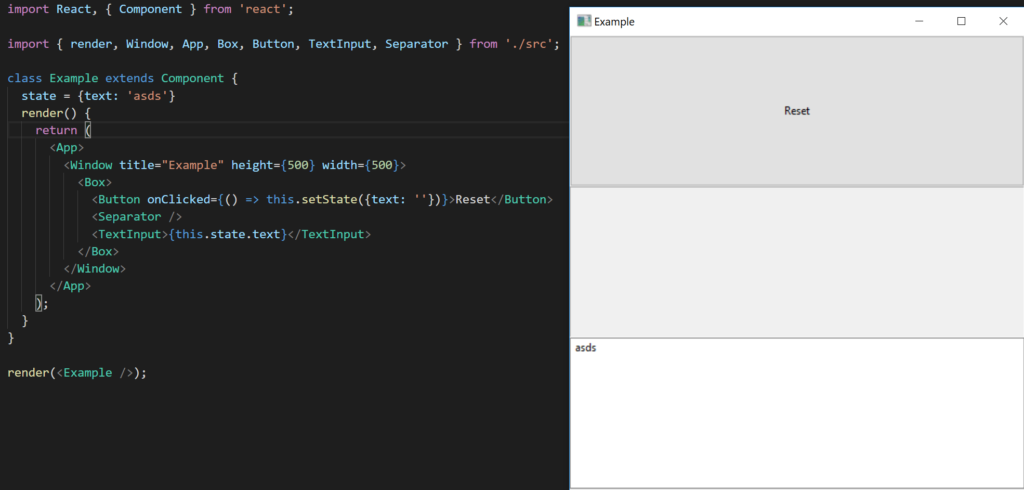
A simple application example:
const win = new libui.UiWindow('Test window', 800, 600, false);Under the hood, he has simple libui binders. (libui: a portable GUI library for C). All of this is compiled through node-gyp, a utility designed to compile native extensions for Node.js. libui-node includes more than 30 ready-made components, well, and if you suddenly decide to create something custom, you will need to dive into the code in C. And besides, the components themselves were written 2 years ago, and since then updated. Perhaps everything is so good that there is no need to make changes, and these 30 components are enough for development, well, or nobody needs the project at all.
Well, actually, the finished application may look like this:

Proton-native and Vuido
And here a little more interesting, proton-native and vuido is the same libui-node, only under React and Vue. The corresponding wrappers are written for the components of libui-node. Despite the number of stars on github (9k and 6k), the projects are abandoned and almost no one uses them. Of all that we could find, these were very simple applications. Another problem that we discovered is problems with customization of the UI itself, it is impossible to do it within libui, and the author of the project is considering rewriting everything in Qt.
The finished application may look like this:
A rather boring interface without customization, so this option disappeared immediately.
Or maybe take Qt?
Qt, js, css
Of course you heard about Qt, and the fact that it can be found everywhere, but not many have heard that it is now integrated with Javascript out of the box. QML allows declarative construction of user interfaces using property binders, and thus, expanding the ability of existing QML elements. Of course, this is more rigorous Javascript than on the web. You can write something similar to ES5 using QML objects, but you will not have a DOM API.
Just a quick note, how would you write in Qt under C ++:
#include <QApplication>
#include <QPushButton>

int main(int argc, char *argv[])
{
   QApplication app(argc, argv); *// Important
*   QPushButton hello("Hello world!");

   hello.resize(100, 30);
   hello.show();
   return app.exec(); *// Important
*}
What your code in Qml might look like:
Item {
    function factorial(a) {
        a = parseInt(a);
        if (a <= 0)
            return 1;
        else
            return a * factorial(a - 1);
    }

    MouseArea {
        anchors.fill: parent
        onClicked: console.log(factorial(10))
    }
}
These components can be created dynamically.
QML also has a large type system , which will undoubtedly be useful when defining all this in Typescript.
You can also easily customize components:
Reactangle {
   id: redRectId
   width: 50
   color: red
}
Almost CSS, isn’t it?
All that remains to be added is what Qt can do on most platforms.
And we would have Node.js
When searching for “nodejs + qt”, we will immediately get node-qt , but it immediately catches the eye that the product has long been dead, and the last time showed signs of life 8 years ago.
Nevertheless, in the search you can find a very fresh project – NodeGui.
NodeGui
Like many libraries for Gui, Qt uses its event / message loop to process events from widgets. Therefore, when we conditionally call app.exec (), Qt starts the message loop and blocks it there. All this is good when there is only one message loop in the entire application. But since we need to use Qt with NodeJs, and the latter, moreover, has its own event loop, it is impossible to integrate them so easily. But such decisions have already been made, for example, the same bundle with Electron or yode. These solutions have their own peculiarity, they raise at least 2 processes – for the main thread, and for the renderer. Despite this, this approach has a significant gain, no need to modify NodeJs or Chromium.
In the case of NodeGui, the situation is slightly different, there is one process for everything, and thus, there is no need to fumble events between processes. Nodejs was forked for this — and minor improvements were made to the necessary binders in Qt. And now you need to start the process not as usualnode main.js, but qode main.js. Fortunately, qode is published as an npm module in the @ nodegui / qode package. In order to start a simple hello world you need to install a few more packages, for more details for each OS you can see on the official website: https://docs.nodegui.org/docs/guides/getting-started
By default, in nodegui, everything is a widget, and they can be screwed to various templates. There are currently 2 types of templates in nodegui: FlexLayout and QGridLayout.
Styles in Nodegui
At the moment, you can set styles for widgets both inline and through styleSheet.
widget.setInlineStyle(`color: green`)

view.setStyleSheet(`

`#helloLabel {
   color: red;
   padding: 10px;
}

#worldLabel {
   color: green;
   padding: 10px;
}

#rootView {
   background-color: black;
}
`);
Qt by default supports all CSS2 selectors ( https://doc.qt.io/qt-5/stylesheet-syntax.html#selector-types )
It also does not do without custom properties for styling components. Fortunately, such features are already described in Qt’s docks and chewed on stackoverflow.
*QPushButton* {
    qproperty-iconsize: 20px 20px;
}
Angular
As already mentioned at the beginning, Angular can do most of the platforms, but so far there has been no platform for the desktop. Due to the well-designed and structured Angular API, the implementation of nodegui for Angular comes down to writing a custom platformBrowserDynamic with Renderer and replacing them in the application.
But how does it all work from the inside out?
We have a conditional main.ts, and we’ll start with it.
The bootstrap process consists of two parts: creating a platform and throwing a start module into it.
platformBrowserDynamic().bootstrapModule(AppModule);Through createPlatformFactory we can create absolutely any platform you need. For us, this means that we do not want to work with the usual DOM, and in addition we’ll go over the description of the elements interaction scheme when working with the render. More information about creating the platform can be found in the source.
In the start module, we describe which component to render first. When you create an instance of a component, Angular calls renderComponentand, linking it to the desired render it receives, with that instance of the component. Everything that Angular will do regarding component rendering (creating elements, setting attributes, subscribing to events, etc.) will go through this renderer. Therefore, we need to replace the RendererFactory.
First of all, in Renderer we will be interested in the createElement method. In this method, we get the name of the tag, and from it we need to create the desired component. Fortunately, nodegui has a basic set of components, which we carefully ported and described how they will be rendered within the framework of Angular, throwing everything into the general directory of components. Other actions with standard components will also pass through this renderer.
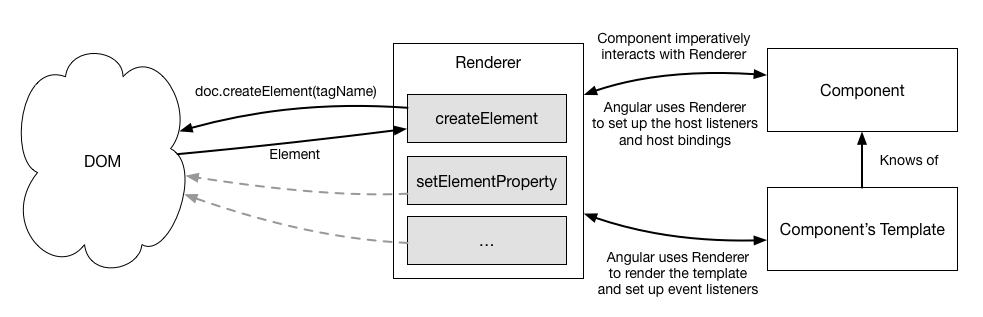
To listen to events in the renderer, the name of the event is thrown, and for these components we hang the usual eventListener.
listen(target: any,
       eventName: string,
       callback: (event: any) => boolean | void): () => void {

  const callbackFunc = (e: NativeEvent) => callback.call(target, e);

  target.addEventListener(eventName, callbackFunc);

  return () => target.removeEventListener(eventName, callbackFunc);

}
Component events are exactly the same as Qt, for example, instead of the usual, (click)=”clickFunc($event)”you need to write (clicked) = ”clickFunc($event)”.
Currently 16 standard components are available. But if you need to write your custom component, then there is always the opportunity to do this through QWidget.
A router was also made to make our application as compatible as possible with Angular.
const appRoutes: Routes = [
      { path: 'home', component: HomeComponent },
      { path: 'about', component: AboutComponent }
];

// AppModule imports
...
NodeguiRouterModule.forRoot(appRoutes),
We build the prod environment
In order to build a ready-made application, nodegui has its own packer – @nodegui/packer.
The utility is very simple, it consists of 2 teams so far.
npx nodegui-packer – init myapp
This command will create a packaging folder containing the template. You can change the contents to add an icon, change the name, description and other information of the application, as well as to add the necessary dependencies.
npx nodegui-packer – pack
This command launches the necessary tool for packaging (for example, macdeployqt for mac) and packs the dependencies.
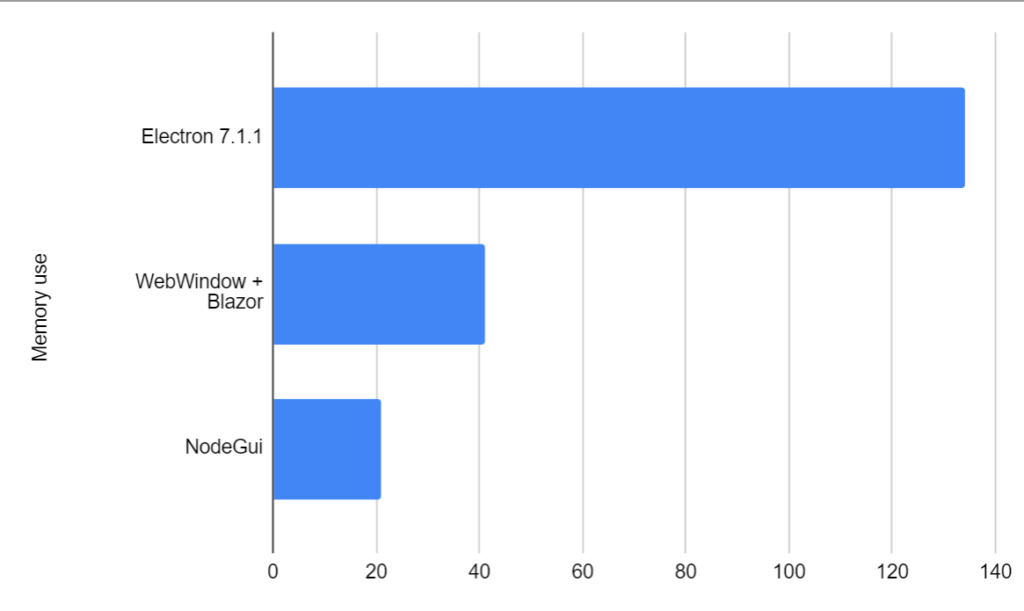
In conclusion
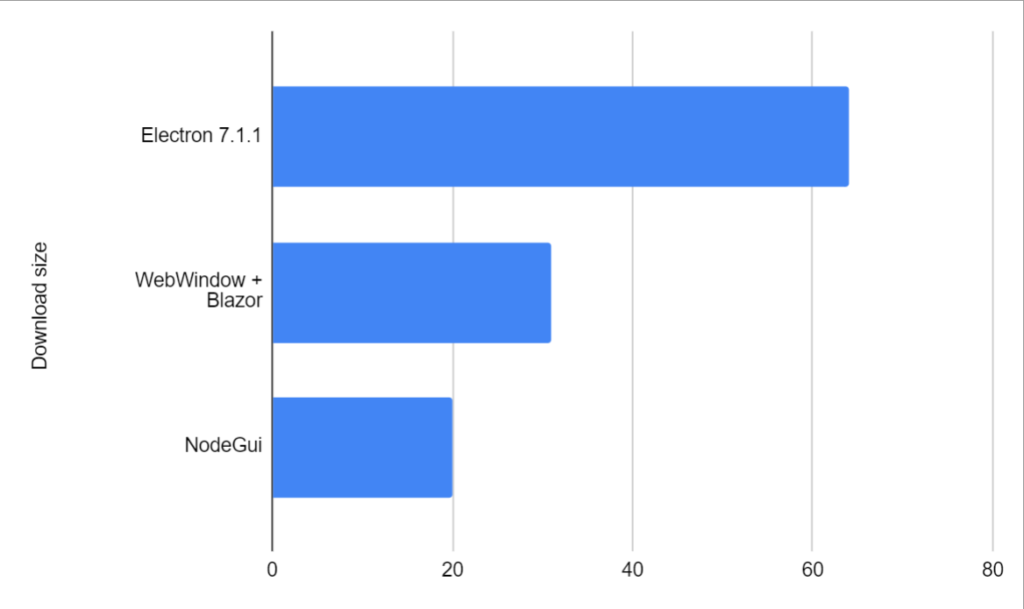
In conclusion, we want to compare the results with other web solutions on the desktop (the results of running under Mac OS).


About The Author: Yotec Team
More posts by Yotec Team