
This article will focus on the assembly and installation of OpenCV 4 for C / C ++, Python 2 and Python 3 from source files with additional CUDA 10 modules on Windows.
We tried to include here all the subtleties and nuances that you may encounter during the installation, and about which it is not written in the official manual.
The assembly was tested for:
Windows 8.1 + Visual Studio 2017 + Python 2/3 + CUDA 10.0 + GeForce 840m
Windows 10 + Visual Studio 2019 + Python 2/3 + CUDA 10.0 + GeForce GTX 1060
Attention! The build will not work for version OpenCV 4.0.1 and / or CUDA below version 10. CUDA 9 and below is supported by OpenCV 3.
What you need to install
The following tools were used in my assembly:
- CMake 3.15
- MS Visual Studio 2019 64-bit + CMake C ++ tools for Windows
- Python 3.7.3 64-bit + NumPy 64-bit
- Python 2.7.16 64-bit + NumPy 64-bit
- CUDA 10.0
- CuDNN 7.6.2
- OpenCV 4.1.1 and OpenCV-contrib-4.1.1
Installation
Since the installation is done through console commands, you should carefully and accurately carry out all the steps. Also, if necessary, change the installation paths to your own.
First you need to install the required software, and Visual Studio must be installed before CUDA:
- CMake (version> = 3.9.1)
- MS Visual Studio
- Python 3.7 (Anaconda3 distribution)
- CUDA 10.0
- CuDNN 7.6.2
After installing all the components, make sure that the paths for CMake, Visual Studio, Python, CUDA, CuDNN are written in the variables PATH, PYTHONPATH, CUDA_PATH and cudnn, respectively.
Next, download the opencv-4.1.1 and opencv-contrib-4.1.1 source archives to the desired location (in my case, this is C: \ OpenCV ).
git clone https://github.com/opencv/opencv.git -b "4.1.1"
git clone https://github.com/opencv/opencv_contrib.git -b "4.1.1"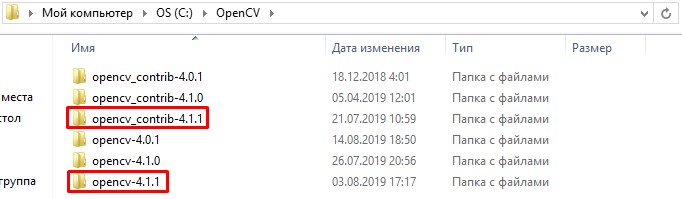
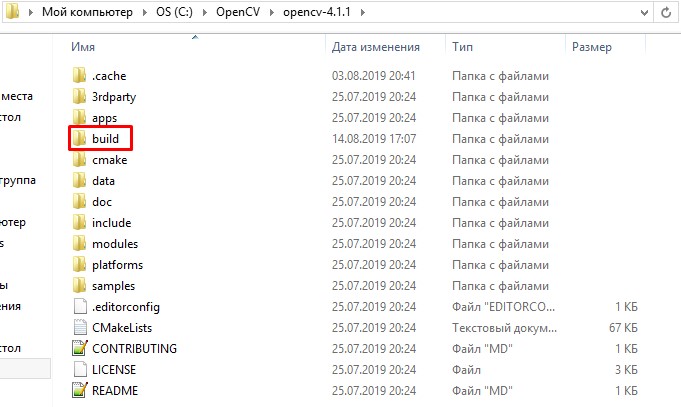
Create the build / folder inside opencv-4.1.1.
Next, we generate assembly files using cmake. We will use the console version of cmake, since cmake-gui confuses the types of some variables (for example, OPENCV_PYTHON3_VERSION) and, as a result, generates files incorrectly.
We open the console along the path C: \ OpenCV \ and register the variables.
set "opencvSource=opencv-4.1.1"
set "opencvExtraModules=opencv_contrib-4.1.1/modules"
set "opencvBuild=%opencvSource%\build"
set "compiler=Visual Studio 16 2019"
set "buildType=Release"Note. For Visual Studio 2017, the generator is written as “Visual Studio 15 2017 Win64” and without the -A flag.
You can also explicitly specify the Python libraries for python 2 and python 3 in case the collector cannot find them automatically.
set "python2_executable=C:/Python27/python.exe"
set "python2_include_dir=C:/Python27/include"
set "python2_library=C:/Python27/libs/python27.lib"
set "python2_numpy_include_dirs=C:/Python27/Lib/site-packages/numpy/core/include"
set "python2_packages_path=C:/Python27/Lib/site-packages"

set "python3_executable=C:/Users/root/Anaconda3/python.exe"
set "python3_include_dir=C:/Users/root/Anaconda3/include"
set "python3_library=C:/Users/root/Anaconda3/libs/python37.lib"
set "python3_numpy_include_dirs=C:/Users/root/Anaconda3/lib/site-packages/numpy/core/include"
set "python3_packages_path=C:/Users/root/Anaconda3/Lib/site-packages"Note. Please note that the NumPy library must be the same bit depth as OpenCV. Checking this out is easy:
import numpy.distutils.system_info as sysinfo
print(sysinfo.platform_bits)
Generate assembly files using the long command below. In case of unsuccessful generation or errors after executing the command, repeated generation should be performed by cleaning all the files in build / and .cache /.
cmake ^
-B"%opencvBuild%/" ^
-H"%opencvSource%/" ^
-G"%compiler%" ^
-Ax64 ^
-DCMAKE_BUILD_TYPE=%buildType% ^
-DBUILD_opencv_world=ON ^
-DINSTALL_TESTS=OFF ^
-DINSTALL_C_EXAMPLES=OFF ^
-DBUILD_EXAMPLES=OFF ^
-DOPENCV_EXTRA_MODULES_PATH="%opencvExtraModules%/" ^
-DBUILD_PROTOBUF=ON ^
-DBUILD_opencv_python_bindings_generator=ON ^
-DWITH_CUDA=ON ^
-DCUDA_FAST_MATH=ON ^
-DWITH_CUBLAS=ON ^
-DCUDA_ARCH_PTX=7.5 ^
-DBUILD_opencv_python2=ON ^
-DPYTHON2_EXECUTABLE="%python2_executable%" ^
-DOPENCV_PYTHON2_VERSION=2.7.16 ^
-DPYTHON2_INCLUDE_DIR="%python2_include_dir%" ^
-DPYTHON2_LIBRARY="%python2_library%" ^
-DPYTHON2_NUMPY_INCLUDE_DIRS="%python2_numpy_include_dirs%" ^
-DPYTHON2_PACKAGES_PATH="%python2_packages_path%" ^
-DBUILD_opencv_python3=ON ^
-DPYTHON3_EXECUTABLE="%python3_executable%" ^
-DOPENCV_PYTHON3_VERSION=3.7.3 ^
-DPYTHON3_INCLUDE_DIR="%python3_include_dir%" ^
-DPYTHON3_LIBRARY="%python3_library%" ^
-DPYTHON3_NUMPY_INCLUDE_DIRS="%python3_numpy_include_dirs%" ^
-DPYTHON3_PACKAGES_PATH="%python3_packages_path%"
After about 10 minutes, the assembly information and the final lines “Configuring done” and “Generating done” should appear in the console. We check all the information, especially the sections of NVIDIA CUDA, Python 2, Python 3.

Next, we build the solution. It may take several hours to build, depending on your processor and version of Visual Studio.
cmake --build %opencvBuild% --target ALL_BUILD --config ReleaseInstall the solution.
cmake --build %opencvBuild% --target INSTALL --config ReleaseAfter successful installation, create the OPENCV_DIR system variable with the value C: \ OpenCV \ opencv-4.1.1 \ build \ install \ x64 \ vc15 \ bin and also add it to PATH.
Test
We will test the functionality of OpenCV with the CUDA module using a simple example of matrix multiplication.
An example of Python 3
import numpy as np
import cv2 as cv
import time

rand = np.random.random((1024, 1024)).astype(np.float32)
h_array1 = np.stack([rand, rand],axis=2)
h_array2 = h_array1
d_array1 = cv.cuda_GpuMat()
d_array2 = cv.cuda_GpuMat()
d_array1.upload(h_array1)
d_array2.upload(h_array2)

start = time.time()
cv.cuda.gemm(d_array1, d_array2, 1, None, 0, None, 1)
end = time.time()
print("Time elapsed:", end - start, "sec")
Console output
Time elapsed: 0.3130002021789551Remove
To remove OpenCV, you need to run the command.
cmake --build %opencvBuild% --target uninstall --config Releaseand remove the OPENCV_DIR system variable and remove the path to OpenCV from PATH.
Conclusion
In this article, we examined the installation of OpenCV 4 for Windows 10. This algorithm was tested on Windows 8.1 and Windows 10, but, in theory, it can be built on Windows 7. For more information, refer to the list of sources below.
P.S. Finally, we will bring all the installation commands into a single .bat file for those who want to automate the installation.
cd C:\OpenCV

git clone https://github.com/opencv/opencv_contrib.git -b "4.1.1"
git clone https://github.com/opencv/opencv.git -b "4.1.1"

ren opencv opencv-4.1.1
ren opencv_contrib-4.1.1

set "opencvSource=opencv-4.1.1"
set "opencvExtraModules=opencv_contrib-4.1.1/modules"
set "opencvBuild=%opencvSource%\build"
set "compiler=Visual Studio 16 2019"
set "buildType=Release"

set "python2_executable=C:/Python27/python.exe"
set "python2_include_dir=C:/Python27/include"
set "python2_library=C:/Python27/libs/python27.lib"
set "python2_numpy_include_dirs=C:/Python27/Lib/site-packages/numpy/core/include"
set "python2_packages_path=C:/Python27/Lib/site-packages"

set "python3_executable=C:/Users/root/Anaconda3/python.exe"
set "python3_include_dir=C:/Users/root/Anaconda3/include"
set "python3_library=C:/Users/root/Anaconda3/libs/python37.lib"
set "python3_numpy_include_dirs=C:/Users/root/Anaconda3/lib/site-packages/numpy/core/include"
set "python3_packages_path=C:/Users/root/Anaconda3/Lib/site-packages"

cmake ^
-B"%opencvBuild%/" ^
-H"%opencvSource%/" ^
-G"%compiler%" ^
-Ax64 ^
-DCMAKE_BUILD_TYPE=%buildType% ^
-DBUILD_opencv_world=ON ^
-DINSTALL_TESTS=OFF ^
-DINSTALL_C_EXAMPLES=OFF ^
-DBUILD_EXAMPLES=OFF ^
-DOPENCV_EXTRA_MODULES_PATH="%opencvExtraModules%/" ^
-DBUILD_PROTOBUF=ON ^
-DBUILD_opencv_python_bindings_generator=ON ^
-DWITH_CUDA=ON ^
-DCUDA_FAST_MATH=ON ^
-DWITH_CUBLAS=ON ^
-DCUDA_ARCH_PTX=7.5 ^
-DBUILD_opencv_python2=ON ^
-DPYTHON2_EXECUTABLE="%python2_executable%" ^
-DOPENCV_PYTHON2_VERSION=2.7.16 ^
-DPYTHON2_INCLUDE_DIR="%python2_include_dir%" ^
-DPYTHON2_LIBRARY="%python2_library%" ^
-DPYTHON2_NUMPY_INCLUDE_DIRS="%python2_numpy_include_dirs%" ^
-DPYTHON2_PACKAGES_PATH="%python2_packages_path%" ^
-DBUILD_opencv_python3=ON ^
-DPYTHON3_EXECUTABLE="%python3_executable%" ^
-DOPENCV_PYTHON3_VERSION=3.7.3 ^
-DPYTHON3_INCLUDE_DIR="%python3_include_dir%" ^
-DPYTHON3_LIBRARY="%python3_library%" ^
-DPYTHON3_NUMPY_INCLUDE_DIRS="%python3_numpy_include_dirs%" ^
-DPYTHON3_PACKAGES_PATH="%python3_packages_path%"

cmake --build %opencvBuild% --target ALL_BUILD --config Release
cmake --build %opencvBuild% --target INSTALL --config Release


About The Author: Yotec Team
More posts by Yotec Team